Thursday, July 26, 2012

Recycle in Style!

My youngest daughter has been interested in recycling since she learned more about it in school last year. Now, she looks on the bottom of just about every container to see if it has the triangle label showing that it can be recycled. But, instead of throwing it in the recycle bin, she has found ways to recycle items throughout the house... such as cereal boxes, jars, and milk cartons. I'm amazed at her creativeness, and I'm positive it didn't come from me.

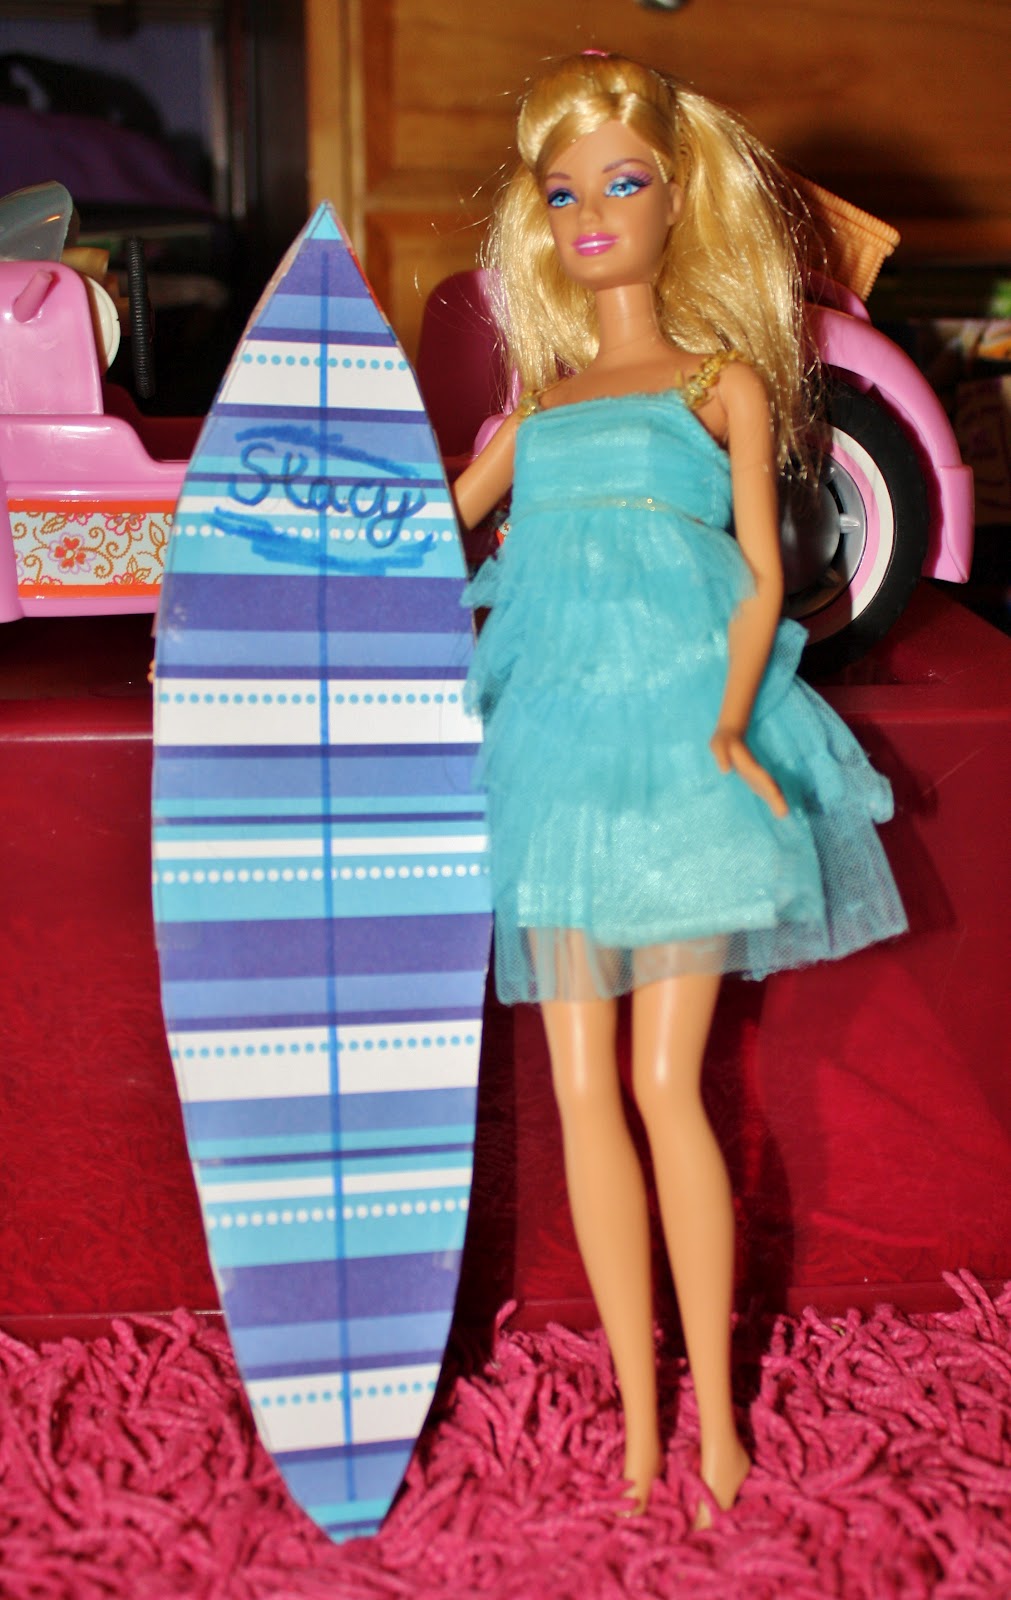
For example, she has recently found an interest in surfing, and has always loved Barbies. So, combine the two and you've got a Barbie surfboard! I'm seriously thinking about patenting this idea. My husband (who also has a love for surfing) drew a surfboard on the inside of a cereal box, and my daughter cut it out and decorated it with craft paper.


And so began my inspiration... I thought it would be fun to look around the web for some other ways to recycle the items we typically would throw away, and here are a few I particularly liked.

(Photo courtesy of BuzzFeed)

Take a clean lotion bottle and carefully cut out the shape shown above. Paint or stencil the outside and tada! you have a handy all-in-one-place phone charger. No more cords all over your counters, floors, or desk. I love this idea and will be making my own very soon!

 (Photo courtesy of ThriftyFun)

A bird feeder out of a milk jug! This is a simple and fun activity to do with your kids. At some point, I'm guessing we've all had a milk/water jug that we were done with. You could make this fancy or just cut the holes and place it outside on a post or hanging. I've priced out bird feeders before, and they can definitely be a little pricey. This one is practically free! You'll need to add birdseed, however... Go HERE for directions to make your own.

(Photo courtesy of CraftyNest)

Hanging (or not hanging) glass jar lanterns. I love this idea of using your glass jars as beautiful lanterns for entertaining outside! If you have a deck or patio, you could place your clean jars out with beautiful votives and have a nice evening outdoor party or get-together.

I often have jars from pasta sauce, peanut butter, oil, etc and don't know how to use them, so they usually end up in the recycling bin. When I was a little girl, I remember my mom using mason jars for glasses to drink out of. It added a country feel to our kitchen with very little money.

TIP: In order to clean your jars from the labels that are usually hard to get off, soak them in hot water for at least 5 minutes (or run them through your dishwasher cycle), then use a product such as "Goo Gone"and you should be able to get it right off.

I'd love to know how you recycle in your home!

My Savings Site

For those of you who know me only as an amateur sewing/crafty person, I thought I'd let you in on a whole other side to me! You'd be amazed at just how many sides I have... even my poor husband has a hard time keeping up.

Coupon Saving Game Button

I have a frugal side to me. And even started a blog back in 2008 to showcase this side of me and to help others save like I do. Although I don't keep up on the blogging side of it as much anymore, I decided to go ahead and put a link on this site in case you're interested in learning more about saving. You'll find this link on the menu bar and I'll try to update you as I post savings.

Here's a direct link to my savings site: http://thecoupongame.blogspot.com

Thursday, July 12, 2012

My Realities of Homeschooling

So, since this is my blog about life, sewing, and everything I enjoy in this world, I thought I'd do a little post on my thoughts as a homeschooling mom. 'k?

When I first started homeschooling, I felt as though it was thrust upon me. My oldest daughter was an eager learner and told me one day, "Mommy, I want to read." That was it. Well, actually, I hesitated and said, "Not yet." After all, she was only three years old at the time. I was not ready for the challenge of teaching my child how to read at such a young age. After her continued asking and begging to learn how to read (Did I mention she is an E.A.G.E.R. learner?), I caved and said, "Okay." She was almost four at that time. I picked up the Kindergarten Hooked On Phonics box I found on sale at my Big Lots store and I started teaching my Sophie how to read. It was a breeze! (Once again, please remember that she is an E.A.G.E.R. learner - I cannot stress that enough.)

And thus started my world of homeschooling. Sophie got to be of school age and I found she was too smart (Can I say that about my own daughter?!) to enter Kindergarten when I thought she was ready for 1st grade. No school would allow her to move up, so we decided to continue on with our homeschooling venture. Most days, she would wake up asking me, "When do we do school?" and I would drag out the books and begin teaching. I dreaded it. And looking back, I wonder why?! She was, quite possibly, the easiest child on the planet to teach. And I know this because I have two other children who are more normal learners.

After 5 years of teaching two of our children at home and our third now entering Kindergarten, I told my husband I needed a break from homeschooling. He agreed and we prayed about what school to send them to. God provided the funds for a wonderful Christian school and we went full force in that direction. The kids thrived in the school, and after some initial hesitation, they even loved it! Of course, I missed my kids, but I knew they needed this year to learn and grow in more ways than one.

And now we come to present day. We were excited to continue on with this wonderful school, until one day, very recently, God placed it on my heart that I was to homeschool again. To say that I was devastated is an understatement. (Just being honest here!) I know my inconsistencies as a home teacher... I know my mood swings and how I struggle to keep my mentality calm and collected when my kids are driving me nuts. I know how I lose my cool when my kids don't get the concepts that I'm trying my very hardest to teach them. I know that my house will be a place of many little messes, including books everywhere, crayons on my floor, dishes not done, dinner not planned, and those little pieces of paper that the kids just had to cut up to make a special card for someone.

And yet, the Lord stills my heart. And I find a desire and even longing to homeschool my children again... to raise them up as only He desires me to. I know that I will need time in His Word daily to make it through those rough days that will most likely be more than not. Note: I will need to earnestly seek out that time. However, I eagerly anticipate what God has planned for all three of my children and for me.

My heart... I asked God for each one of my children, and He chose to bless us with each one. I can say without hesitation that I not only love my kids, I really like them! They are, by far, the coolest people I know. I pray for a renewed joy in my heart to teach them at home and to enjoy each moment with them.

Thursday, July 5, 2012

Simply Crepes


We love these crepes! They don't last long in our house... I actually made 10 of them, and this was all that was left for me to take the picture! That says somethin' right there. I love them with some warm Nutella spread inside before rolling. YUM!

Ingredients:
1 cup all-purpose flour, level scoop
2/3 cup cold milk
2/3 cup cold water
3 large eggs
1/4 tsp salt
3 Tbs melted butter, plus more for brushing on pan

Instructions:
Mix all the ingredients smoothly in a blender or food processor, or with a whisk. Refrigerate 30 minutes or more. A rest allows the flour particles to absorb the liquid, making for a tender crepe. Heat a nonstick frying pan (I used an 8″ stainless steel and it worked great.) with bottom diameter 5 to 8 inches until drops of water dance on it; brush lightly with melted butter. Pour in 2 to 3 tablespoons of batter (a small ladle is handy here) and tilt pan in all directions to cover bottom evenly. Cook about 1 minute, or until browned on the bottom; turn and cook briefly on the other side. Cool on a wire rack as you continue with the rest. When thoroughly cool, stack and refrigerate for 2 days, or freeze for several weeks.

*Crepes are an inexpensive way to jazz up a simple dish.

Serve for breakfast with softened cream cheese spread and fresh preserves. Roll up as pictured or fold into fourths and serve with a sprinkling of powdered sugar.

This recipe courtesy of Julia’s Kitchen Wisdom by Julia Child.

Mini Chocolate Ice Cream Cookies

These are a favorite summer treat in our house. I love the simplicity of them, and they even have some health value to them... note, I said "some." Made with natural ingredients, their a great go-to treat to make ahead and have on-hand.

Ingredients:
1 box Back to Nature Oatmeal Cookies
1 1/2 c Breyers 1/2 the fat All Natural Vanilla Ice Cream
1.5 oz Ghirardelli 60% Cacao Bittersweet Chocolate, chopped finely

Instructions:
Remove ice cream from freezer and let stand at room temperature for 5-10 minutes to soften. In the meantime, chop chocolate finely. Line a freezer-proof container with wax paper. Place 1 cookie face-down and scoop approximately 2 tablespoons ice cream onto cookie and top with another cookie, pressing slightly to flatten. Roll the edges of your cookie sandwich in chocolate to cover sides. Place in container and put in freezer to allow to firm-up.

*Yields 10 cookie sandwiches.